Apache Ignite 살펴보기
아파치 재단에서 Apache Ignite라는 분산형 데이터베이스 서비스를 출시했다. 메모리와 저장장치 간 데이터를 분산하여 속도, 안정성 모두 고려하여 개발된 데이터베이스로 보인다. 사이트에 접속해보면 여러가지 기술들이 나열되어 있는데 이론적인 이야기는 일단 제쳐두고 간단하게 메모리 DB로 사용해 본 내용을 본 포스트에 기재한다.
만약 지원하는 기술 및 각종 가이드가 궁금한 사람은 아래 사이트에 접속해서 확인해보면 된다.
Apache Ignite 설치 및 서버 실행
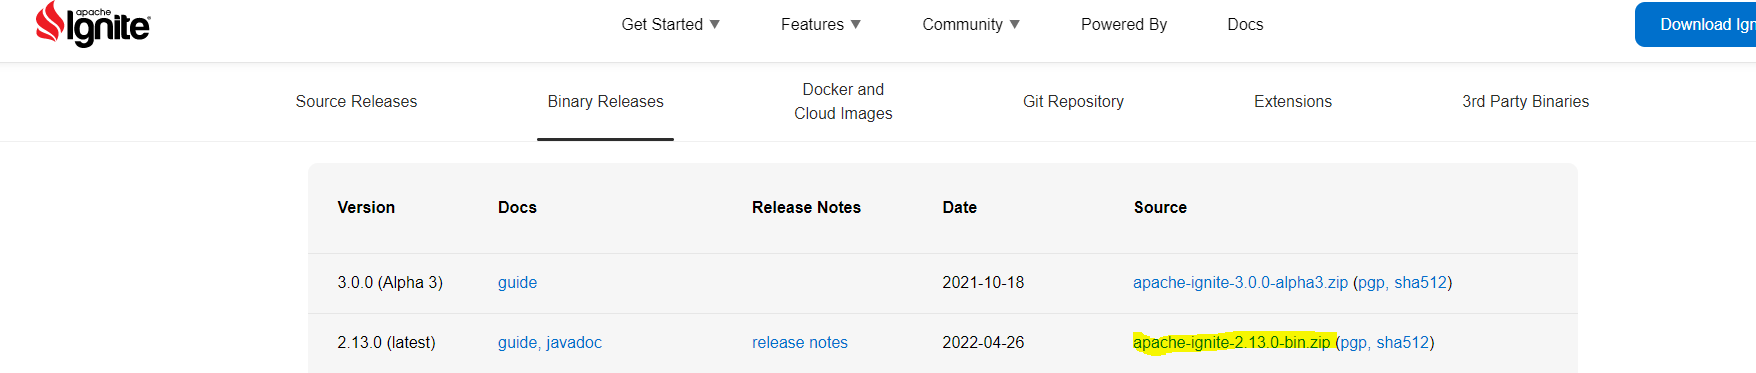
Apache Ignite를 사용하기 위해선 먼저 사이트에 접속하여 다운로드 페이지에서 Ignite를 다운로드 받아야 한다.
위 사이트에 접속하여 원하는 버전을 다운로드 받는다. 필자는 포스트 작성 당시 latest 버전인 2.13.0를 받았다.
다운로드 받은 zip 파일을 압축해제한 뒤, 해당 폴더를 명령 프롬프트로 진입한다. (윈도우에서 진행했기 때문에 cmd를 이용하였다.)
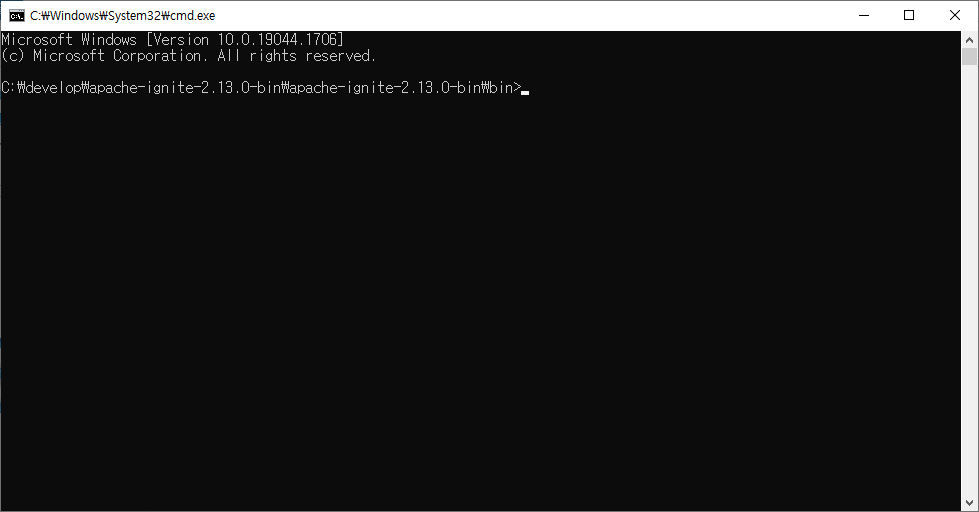
bin 폴더 내부에 진입했다면 아래 명령어를 실행해주자. Windows와 Unix 간 명령어가 다른 것에 주의. (bat, sh)
# Windows
ignite.bat ..\examples\config\example-ignite.xml

# Unix
./ignite.sh ../examples/config/example-ignite.xml
아래 이미지와 같이 서버가 구동되는지 확인한다.

java는 1.8_301 버전을 이용
openjdk 1.8 버전에서 에러가 발생하여 추후 알아볼 예정
Java client를 이용하여 기본 구현
평소에 사용하던 언어인 Java를 이용하여 기본 메모리 DB에 read, write를 하는 클라이언트를 작성하였다. Ignite 사이트에 각종 다른 언어 매뉴얼이 있으니 다른 언어는 사이트의 가이드에서 확인할 수 있다.
우선 첫번째로 maven project를 생성하여 pom.xml에 ignite 의존성을 추가한다.
<properties>
	<ignite.version>2.13.0</ignite.version>
</properties>

<dependencies>
	<dependency>
		<groupId>org.apache.ignite</groupId>
		<artifactId>ignite-core</artifactId>
		<version>${ignite.version}</version>
	</dependency>
	<dependency>
		<groupId>org.apache.ignite</groupId>
		<artifactId>ignite-spring</artifactId>
		<version>${ignite.version}</version>
	</dependency>
</dependencies>
그 후 Java 코드를 작성한다. Ignite에서 제공하는 기본 코드다.
package main;

import java.util.Collections;

import org.apache.ignite.Ignite;
import org.apache.ignite.IgniteCache;
import org.apache.ignite.Ignition;
import org.apache.ignite.configuration.IgniteConfiguration;
import org.apache.ignite.lang.IgniteRunnable;
import org.apache.ignite.resources.IgniteInstanceResource;
import org.apache.ignite.spi.discovery.tcp.TcpDiscoverySpi;
import org.apache.ignite.spi.discovery.tcp.ipfinder.multicast.TcpDiscoveryMulticastIpFinder;

public class IgniteTest {
	public static void main(String[] args) {
		// Preparing IgniteConfiguration using Java APIs
        IgniteConfiguration cfg = new IgniteConfiguration();

        // The node will be started as a client node.
        cfg.setClientMode(true);

        // Classes of custom Java logic will be transferred over the wire from this app.
        cfg.setPeerClassLoadingEnabled(true);

        // Setting up an IP Finder to ensure the client can locate the servers.
        TcpDiscoveryMulticastIpFinder ipFinder = new TcpDiscoveryMulticastIpFinder();
        ipFinder.setAddresses(Collections.singletonList("127.0.0.1:47500..47509"));
        cfg.setDiscoverySpi(new TcpDiscoverySpi().setIpFinder(ipFinder));

        // Starting the node
        Ignite ignite = Ignition.start(cfg);

        // Create an IgniteCache and put some values in it.
        IgniteCache<Integer, String> cache = ignite.getOrCreateCache("myCache");
        cache.put(1, "Hello");
        cache.put(2, "World!");

        System.out.println(">> Created the cache and add the values.");

        // Executing custom Java compute task on server nodes.
        ignite.compute(ignite.cluster().forServers()).broadcast(new RemoteTask());

        System.out.println(">> Compute task is executed, check for output on the server nodes.");

        // Disconnect from the cluster.
        ignite.close();
	}

	/**
     * A compute tasks that prints out a node ID and some details about its OS and JRE.
     * Plus, the code shows how to access data stored in a cache from the compute task.
     */
    private static class RemoteTask implements IgniteRunnable {
        @IgniteInstanceResource
        Ignite ignite;

        public void run() {
            System.out.println(">> Executing the compute task");

            System.out.println(
                "   Node ID: " + ignite.cluster().localNode().id() + "\n" +
                "   OS: " + System.getProperty("os.name") +
                "   JRE: " + System.getProperty("java.runtime.name"));

            IgniteCache<Integer, String> cache = ignite.cache("myCache");

            System.out.println(">> " + cache.get(1) + " " + cache.get(2));
        }
    }
}
Ignite 가이드에서 제공하는 Java 코드는 기본 cache를 하나 만든 뒤, 해당 cache에 데이터 2개를 저장한 후, 서버에서 해당 데이터를 출력하는 task를 보내는 방식으로 작성되어 있다. 위 코드를 작성한 뒤 코드를 실행해보면 아래와 같이 Java 콘솔이 출력된다.
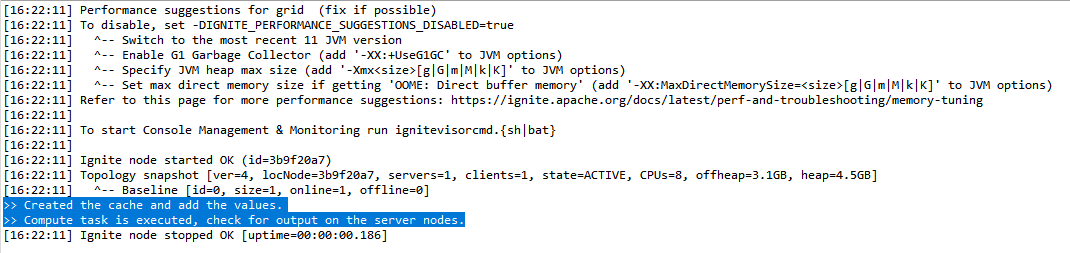
클라이언트에서 작성한대로, 서버에 task를 execute했으니 서버 콘솔을 확인해보라는 메시지가 나온다면 성공이다. 이제 Ignite 서버 콘솔을 확인한다.

task에 작성한대로 콘솔에 데이터가 출력되는 모습이 확인된다. 서버의 cache에 데이터가 잘 저장되었다.
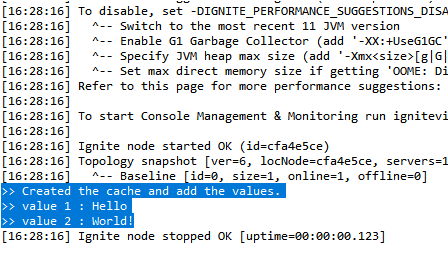
다음은 클라이언트에서 값을 저장하고, 서버에서 확인하는 것이 아니라 클라이언트에서 값을 확인해보는 코드를 작성하였다.
package main;

import java.util.Collections;

import org.apache.ignite.Ignite;
import org.apache.ignite.IgniteCache;
import org.apache.ignite.Ignition;
import org.apache.ignite.configuration.IgniteConfiguration;
import org.apache.ignite.spi.discovery.tcp.TcpDiscoverySpi;
import org.apache.ignite.spi.discovery.tcp.ipfinder.multicast.TcpDiscoveryMulticastIpFinder;

public class IgniteTest {
	public static void main(String[] args) {
		// Preparing IgniteConfiguration using Java APIs
        IgniteConfiguration cfg = new IgniteConfiguration();

        // The node will be started as a client node.
        cfg.setClientMode(true);

        // Classes of custom Java logic will be transferred over the wire from this app.
        cfg.setPeerClassLoadingEnabled(true);

        // Setting up an IP Finder to ensure the client can locate the servers.
        TcpDiscoveryMulticastIpFinder ipFinder = new TcpDiscoveryMulticastIpFinder();
        ipFinder.setAddresses(Collections.singletonList("127.0.0.1:47500..47509"));
        cfg.setDiscoverySpi(new TcpDiscoverySpi().setIpFinder(ipFinder));

        // Starting the node
        Ignite ignite = Ignition.start(cfg);

        // Create an IgniteCache and put some values in it.
        IgniteCache<Integer, String> cache = ignite.getOrCreateCache("myCache");
        cache.put(1, "Hello");
        cache.put(2, "World!");

        System.out.println(">> Created the cache and add the values.");

        System.out.println(">> value 1 : " + cache.get(1));
        System.out.println(">> value 2 : " + cache.get(2));

        // Disconnect from the cluster.
        ignite.close();
	}
}
cache에서 키를 이용하여 get을 해주면 간단하게 클라이언트에서 데이터를 조회할 수 있다. 아래 콘솔을 확인하자.
서버가 작동되고 있는 한, 데이터가 유지되야하기 때문에 다음은 서버에 값을 저장하지 않고 바로 조회하는 코드를 작성하였다.
package main;

import java.util.Collections;

import org.apache.ignite.Ignite;
import org.apache.ignite.IgniteCache;
import org.apache.ignite.Ignition;
import org.apache.ignite.configuration.IgniteConfiguration;
import org.apache.ignite.spi.discovery.tcp.TcpDiscoverySpi;
import org.apache.ignite.spi.discovery.tcp.ipfinder.multicast.TcpDiscoveryMulticastIpFinder;

public class IgniteTest {
	public static void main(String[] args) {
		// Preparing IgniteConfiguration using Java APIs
        IgniteConfiguration cfg = new IgniteConfiguration();

        // The node will be started as a client node.
        cfg.setClientMode(true);

        // Classes of custom Java logic will be transferred over the wire from this app.
        cfg.setPeerClassLoadingEnabled(true);

        // Setting up an IP Finder to ensure the client can locate the servers.
        TcpDiscoveryMulticastIpFinder ipFinder = new TcpDiscoveryMulticastIpFinder();
        ipFinder.setAddresses(Collections.singletonList("127.0.0.1:47500..47509"));
        cfg.setDiscoverySpi(new TcpDiscoverySpi().setIpFinder(ipFinder));

        // Starting the node
        Ignite ignite = Ignition.start(cfg);

        // Create an IgniteCache and put some values in it.
        IgniteCache<Integer, String> cache = ignite.getOrCreateCache("myCache");

        System.out.println(">> value 1 : " + cache.get(1));
        System.out.println(">> value 2 : " + cache.get(2));

        // Disconnect from the cluster.
        ignite.close();
	}
}
콘솔을 확인해서 이전에 저장했던 데이터가 잘 나오는지 확인한다.
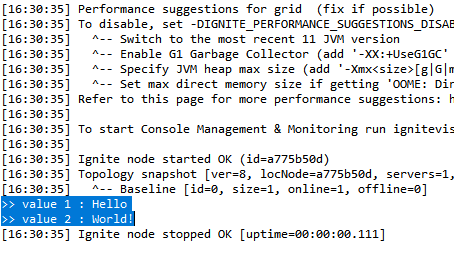
메모리 DB로 사용되기 때문에, 서버가 기본설정 상 정지되면 기존의 값들이 사라질 것이다. 직접 확인해보기 위해 서버를 재시작한 뒤 데이터를 다시 조회해봤다.
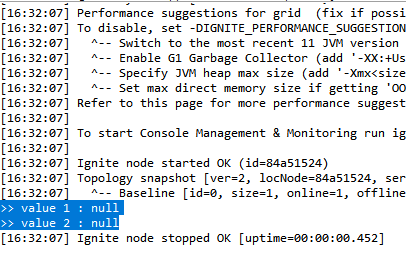
기존 데이터가 삭제되고 null로 출력되는 모습을 확인할 수 있다.
데이터 영속성 설정
ignite는 서버가 중지되더라도 데이터가 소멸되지 않는 데이터 영속성 설정을 할 수 있다. 컴퓨터의 저장장치와 연계하여 데이터가 유지되는 것으로 보인다. 일단 기본적인 기능들을 먼저 사용해보기 위해 이론적인 내용보다 코드를 먼저 작성했기때문에 정확한 동작 매커니즘은 아직 파악하지 못하였다.
데이터 영속성을 설정하는 방법은 사이트의 가이드에 여러가지 방법이 소개되어 있는데, 본 포스트에서는 xml 파일을 수정하는 방법으로 진행하였다. 본 포스트 상단에 ignite 서버를 실행할 때 입력한 명령어를 보면 bat(또는 sh) 파일 뒤에 ..\examples\config\example-ignite.xml 라고 입력한 부분이 있었는데, 이 xml 파일이 설정파일이다. 해당 폴더(examples\config)에 가보면 여러가지 설정들이 있는데, example-ignite.xml 파일을 그대로 수정하려고 한다.
example-ignite.xml 파일을 보면 example-default.xml 파일을 import 하고 있기 때문에 실제 수정은 example-default.xml 파일을 수정하였다.
example-default.xml 파일 안에 IgniteConfiguration bean(bean id가 ignite.cfg로 되어 있음) 내부에 아래 프로퍼티를 추가해준다.
<property name="dataStorageConfiguration">
    <bean class="org.apache.ignite.configuration.DataStorageConfiguration">
        <property name="defaultDataRegionConfiguration">
            <bean class="org.apache.ignite.configuration.DataRegionConfiguration">
                <property name="persistenceEnabled" value="true"/>
            </bean>
        </property>
    </bean>
</property>
persistenceEnabled 속성을 true로 설정해주면 데이터 영속성이 활성화된다. xml 파일을 수정하고 다시 ignite 서버를 실행시킨다. (본 포스트 상단 실행 명령어와 동일) 하지만 데이터 영속성을 활성화 한 뒤 클라이언트에서 조회 시도 시 아래와 같은 exception이 나타난다.
Exception in thread "main" class org.apache.ignite.IgniteException: Can not perform the operation because the cluster is inactive. Note, that the cluster is considered inactive by default if Ignite Persistent Store is used to let all the nodes join the cluster. To activate the cluster call Ignite.active(true).
데이터 영속성을 사용하려면 cluster 모드가 활성화되어야 하기 때문이다. cluster 모드를 활성화해주기 위해 또다른 cmd 창을 하나 더 실행시킨다.
ignite 서버가 실행되고 있는 상태에서 cluster 모드의 상태가 변경되기 때문에 서버를 실행중인 cmd는 그대로 두고 새로운 cmd에서 진행해야 한다.
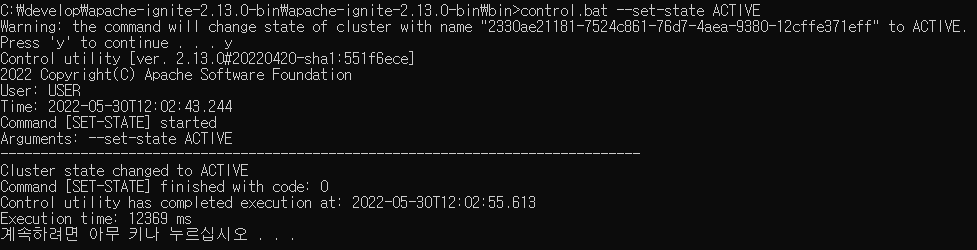
ignite.bat(또는 sh) 파일이 있는 폴더(bin 폴더)에 보면 control.bat(또는 sh) 파일이 있는데, 이 파일을 이용하면 cluster 모드를 활성화할 수 있다. 해당 폴더에서 아래 명령어를 입력해준다.
control.bat --set-state ACTIVE
아래와 같이 나오면 cluster 모드 활성화에 성공한 것이다.
이제 영속성이 잘 동작하는지 확인하기 위해 클라이언트에서 값을 저장한 후 서버를 재시작하였다. 그 뒤 다시 클라이언트에서 데이터를 조회해보았다. (위 클라이언트 코드와 다를 것이 없으므로 코드는 생략)
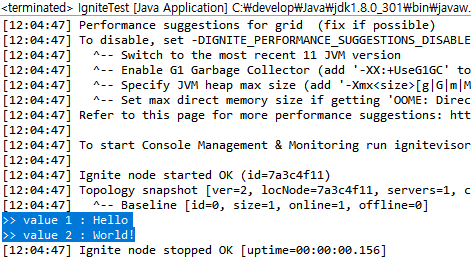
ignite 서버를 재시작했음에도 데이터가 유지되는 모습을 확인할 수 있었다.
여기까지 정말 기본적인 ignite 사용법을 살펴보았다.