Flutter 기본 사용 방법 정리
1. Flutter 란?
Flutter는 모모바일 앱을 개발 할 수 있도록 지원하는 모바일 SDK 입니다.
길게 풀어서 쓰면, 웹 개발자이든, native 모바일 개발자 이든관계없이 프레임워크를 사용하지 않고 단순하고 쉽게 만들수 있는 SDK라고 합니다.
Google에서 개발하였으며, Dart 언어를 사용하는 특징을 가지고 있습니다.
2. Flutter 개발환경 세팅
먼저 Flutter SDK를 원하는 위치에 압축을 해제합니다. (C:\Program Files\와 같이 권한이 필요한 위치에 설치 하지 마세요!)
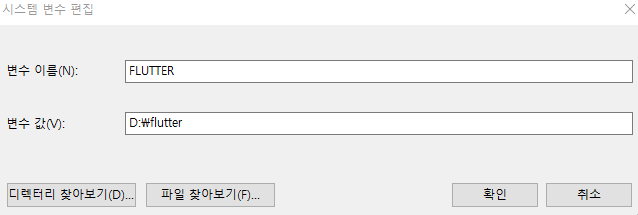
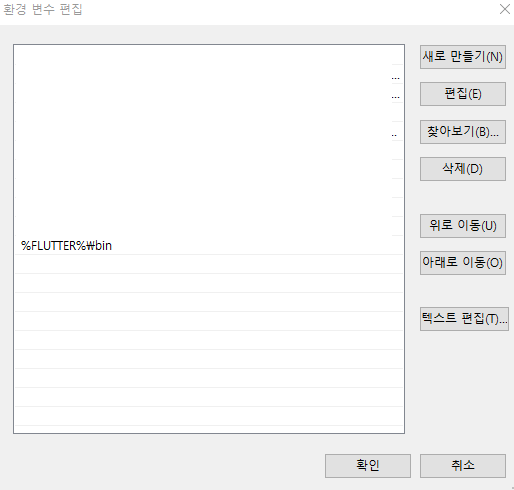
그리고 Flutter 환경 변수를 설정합니다.
시스템 변수 : 변수 : 압축을 푼 위치.
사용자 변수 : %변수%\bin
cmd에서 flutter doctor 명령 실행이 되는지 확인합니다.
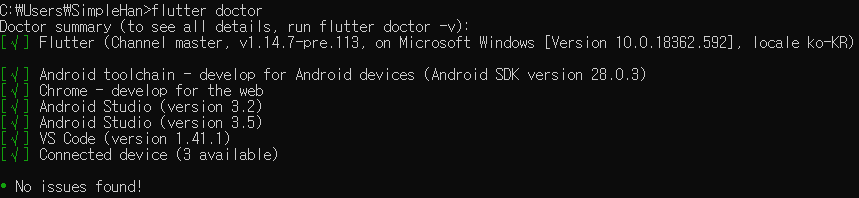
그림과 같이 초록 체크가 되었다면, 정상적으로 설치되었다는 뜻이며 만약 그렇지 않을경우, 어떤게 설치가 안되었는지, 필요한게 무엇인지 알려줍니다.
일단, 당연히 안드로이드 스튜디오와 IDE인 VS Code가 미설치되었으므로, 추가로 설치를 진행합니다.
다음으로는 안드로이드 스튜디오와 비주얼 스튜디오 코드를 설치할 것인데, 따로 설정해야하는 작업은없으며 정상 설치 후
플러그인 환경설정의 마켓플레이스에서 Flutter와 Dart 플러그인을 설치합니다.
(VS Code로 사용할 경우에는 추가로 명령 팔레트에서 Flutter와 Dart를 설치합니다.)
그 후, 다시 flutter doctor 명령어를 통해 정상 설치 되었는지 확인합니다.
3. 기본 프로젝트 생성 및 구조와 UI 작성 방법.
저는 VS Code으로 작업하여, VS Code 기준으로 작성하겠습니다.
일단 VS Code의 터미널에서 프로젝트를 생성할 경로를 잡아줍니다.
그 후 flutter create project_name 명령어를 사용하여, 생성할 수 있습니다.
앱의 기본적인 코드는 lib/main.dart에 있으며,
기본 구조는 다음과 같습니다.
  void main() => runApp(MyApp());

  class MyApp extends StatelessWidget {
    @override
    Widget build(BuildContext context) {
      return MaterialApp(
        title: 'Welcome to Flutter',
        home: Scaffold(
          appBar: AppBar(
            title: Text('Welcome to Flutter'),
          ),
          body: Center(
            child: Text('Hello World'),
          ),
        ),
      );
    }
  }
앱이 실행 될 때 MyApp 클래스를 실행하여 build를 override하여 출력.
MaterialApp의 title은 제목, appBar는 상단 바, body는 내부의 내용을 의미합니다.
UI의 작성방법은 내부의 child나 title에 전달되는 Text를 바꾸면 되는데요,
예를 들면..
  void main() => runApp(MyApp());

  class MyApp extends StatelessWidget {
    @override
    Widget build(BuildContext context) {
      return MaterialApp(
        title: 'Welcome to Flutter',
        home: Scaffold(
          appBar: AppBar(
            title: Text('Welcome to Flutter'),
          ),
          body: new Column(
              children: <Widget>[
                new Text("1번"),
                new Text("2번"),
                new Text("3번"),
              ],
            ),
          ),
        ),
      );
    }
  }
이런식으로 작성 가능합니다!
혹은, 아예 클래스를 생성하여 넣거나, 색상을 지정하는것도 가능합니다.
  void main() => runApp(MyApp());
  class MyApp extends StatelessWidget {
    @override
    Widget build(BuildContext context) {
      return MaterialApp(
        home: BodyContainer(),
        theme: new ThemeData(
          primarySwatch: Colors.blueGrey
        ),
      );
    }
  }

  class BodyContainer extends StatefulWidget {
    @override
    BodyContainerState createState() => BodyContainerState();
  }

  class BodyContainerState extends State<BodyContainer> {
    @override
    Widget build(BuildContext context) {
      return Scaffold(
        appBar: AppBar(
          title: Text('안녕하세요?'),
        ),
        body: new Text("다른 클래스입니다."),
      );
    }
  }
이렇게 작성한 코드를 빌드하려면 flutter run 명령어를 통해 빌드할 수 있으며,
기본적인 디버그는 F5키를 눌러 디버그 모드에 진입할 수 있습니다.
4. 라이브러리 Import
라이브리러 사용법은 pubspec.yaml 파일에서 의존성을 추가하면 됩니다.
예를 들면, 폴더 내부에서 dependencies에 english_words: version 을 추가후,
Flutter pub get 명령어를 통해 외부 라이브러리를 설치 할 수 있습니다..
그 후, import 하는 방법은 main.dart 상단에 import ‘package:english_words/english_words.dart’ 구문을 추가하여 import 할 수 있습니다.
5. 조건문, 반복문, 예외처리문 사용 방법.
  // 1.	if – else
  var number = 57;
  if (number > 100) {
    print('Large Number');
  } else if (number < 100) {
    print('Small Number');
  } else {
    print('number is 100');
  }
  //또는 삼항 연산자를 사용하여 간단히 구현할수도있습니다!
  int age = 60;
  String status = age < 50 ? 'still young' : 'old man';

  // 2.	for
  for (int i=0; i<100; i++) {
    print('number : ' + i);
  }

  // 3.	While
  int i=0;
  while (i < 10) {
    print(i);
    i++;
  }

  // 4.	do while
  int i = 0;
  do {
    print(i);
    i++
  } while (I < 10);

  // 5.	switch
  int age = 50;
  switch (age) {
    case 10 :
      print("ten");
      break
  }

  // 6.	에외처리
  throw new Exception();

  //7.	Try – catch – finally
  try {
    divide(10, 0);
  } catch (e) {
    print(e);
  } finally {
    print('I will always be executed');
  }
다음에는 간단한 예제를 만들어보고, 안드로이드 포팅 및 IOS 포팅에 대해 알아보려고 합니다.
감사합니다.